How to Auto Connect AnyDesk Without Accept: Setting Up AnyDesk Unattended Access
AnyDesk is a widely used remote computer control software globally, known for its seamless ability to connect without requiring manual acceptance. This feature enables users to gain instant access to remote devices. In this article, we will walk you through the process of enabling AnyDesk's unattended access, demonstrating how to connect AnyDesk without accept, and simplifying the establishment of remote connections.
Understand About AnyDesk Auto Connect Without Accept
Imagine seamlessly connecting to your home PC from work without needing someone to approve the request! This functionality, known as unattended access, is a game-changer for remote desktop tools like AnyDesk.
There are times when it's inconvenient to have someone at the other end to accept a connection request. AnyDesk's unattended access solves this by enabling direct connections using a secure password.
Why is this feature crucial?
- Convenience: Avoid interruptions when the remote device has no operator.
- Security: Controlled access using a secure password ensures authorized connections.
- Efficiency: Direct access minimizes time delays during urgent tasks.
To achieve this, AnyDesk must be installed on both devices. The remote device also needs to be powered on and connected to a stable internet connection. After setting up Anydesk auto accept, accessing your device becomes effortless and quick.
Step-by-Step Guide on How to Auto Connect AnyDesk Without Accept
Follow these detailed steps to configure unattended access in AnyDesk:
Step 1: Download and Install AnyDesk:
Start by visiting the official AnyDesk website (www.anydesk.com) and download the appropriate version of AnyDesk for your operating system. Once the download is complete, run the installer and follow the on-screen instructions to install AnyDesk on your computer.
Step 2: Launch AnyDesk and Configure Unattended Access for AnyDesk Connect Without Accept:

- Open AnyDesk on your computer by double-clicking the desktop icon or searching for it in the Start menu.
- In the AnyDesk main window, you will find your AnyDesk address, which consists of a series of numbers. Take note of this address as it will be required for remote connections.
- Click on the "Settings" option in the left sidebar to access the AnyDesk settings menu.
- In the settings menu, navigate to the "Security" tab.
- Under the "Security" tab, you will find the "Unattended Access" section. Enable the "Enable unattended access" checkbox.
- To enhance security, set a strong password for unattended access. Click on the "Set Password" button and enter a password of your choice. Make sure to use a combination of uppercase and lowercase letters, numbers, and special characters.
- Click "OK" or "Apply" to save the changes.
Step 3: Granting Access to Remote Devices:
To auto connect AnyDesk without accept and setting up Anydesk Unattended Access, you need to grant access to the remote device beforehand. Follow these steps to grant access to specific devices:
- Obtain the AnyDesk address of the remote device you want to connect to. The user of the remote device should provide you with their AnyDesk address.
- Open AnyDesk on your computer.
- Click on the "Remote Desk" option in the AnyDesk main window.
- Enter the AnyDesk address of the remote device in the "Remote Desk" field.
- Click the green "Connect" button to initiate the connection.
- If prompted, enter the password you set for unattended access.
- Once the connection is established, you can now access the remote device without manual acceptance.
Note: Ensure that you have the necessary permissions and authorization to access the remote device. Respect the privacy and security of remote devices and only connect to trusted devices.
With these steps, you’ve successfully enabled AnyDesk connect without accept!
Best Alternative to AnyDesk Connect Without Accept
AnyDesk is widely known for its robust remote desktop features, but it’s not without its challenges. Users often encounter issues such as:
- Complex Setup: Configuring security settings in AnyDesk can involve multiple steps, which may be overwhelming for some users.
- Connection Issues: Unstable network conditions can lead to frequent interruptions, disrupting your remote access experience.
If you’re seeking a more user-friendly and reliable alternative, UltraViewer is an excellent choice.
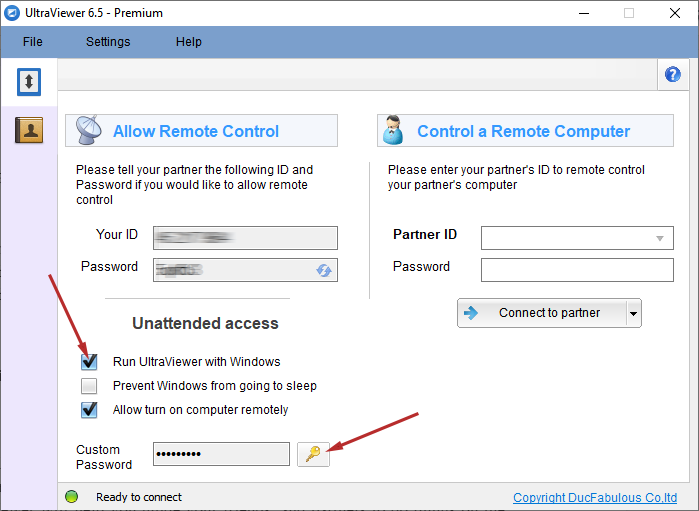
Why UltraViewer Stands Out
- Ease of Use: UltraViewer boasts a simple, intuitive interface that makes the setup process seamless, even for beginners.
- Reliable Performance: With fewer disconnections, you can count on uninterrupted remote sessions, even in less stable network environments.
- Customizability: Whether you’re a casual user or a professional, UltraViewer offers tailored features to meet diverse needs effectively.
For those looking to enable unattended access effortlessly, UltraViewer provides a step-by-step guide that simplifies the process. Check out this detailed tutorial to get started and discover how UltraViewer can streamline your remote desktop experience.
Conclusion
If you're struggling to auto connect AnyDesk without acceptance or setting up Anydesk Unattended Access, there's an alternative solution available with UltraViewer software. UltraViewer offers the same feature, allowing you to effortlessly set up remote computer access without relying on others. Step-by-step instructions on how to access your PC remotely using UltraViewer can be found in the article "How to access my PC remotely?". With UltraViewer, you can enjoy convenient and efficient remote access capabilities for various purposes, including remote support, collaboration, and file sharing. Don't hesitate to download UltraViewer for free and give it a try today.


Write comments (Cancel Reply)