How to Disable UltraViewer Startup with Windows for Better Security
UltraViewer is a widely used remote desktop software that allows users to access and control computers remotely. For convenience, many users enable UltraViewer to start automatically with Windows. However, keeping remote access software running at all times can pose potential security risks, especially if unauthorized access occurs.
To enhance your computer's security, it’s recommended to disable UltraViewer from starting automatically with Windows when you don’t need it. In this guide, we’ll show you two simple methods to disable UltraViewer startup directly from its settings.
When Do You Need Disable UltraViewer Startup?
While UltraViewer is a secure and reliable remote desktop tool, enabling it to launch at startup may not always be necessary. Here’s why you might want to disable its automatic startup:
- Enhanced Security – If UltraViewer runs automatically, unauthorized users may attempt to access your computer without your knowledge. Disabling startup ensures it only runs when needed.
- Better Control Over Remote Access – Keeping UltraViewer disabled at startup allows you to launch it manually only when remote access is required.
- Reduced Exposure to Unauthorized Connections – If your UltraViewer ID and password are exposed, an active UltraViewer session can increase the risk of unauthorized access.
By disabling UltraViewer from starting with Windows, you maintain full control over when and how it runs, ensuring your computer remains secure.
Method 1: Disable UltraViewer Startup with Administrator privilege
UltraViewer allows you to disable automatic startup through its built-in settings. Follow these simple steps:
Step 1: Open UltraViewer with Administrator Rights
To ensure you have permission to modify settings, follow these steps:
- Locate the UltraViewer icon on your desktop or in the Start menu.
- Right-click the icon and select Run as administrator > OK
Step 2: Access UltraViewer Settings
- Once UltraViewer opens, click on Menu Settings.
- Select Options from the dropdown menu.
Step 3: Disable Auto Startup
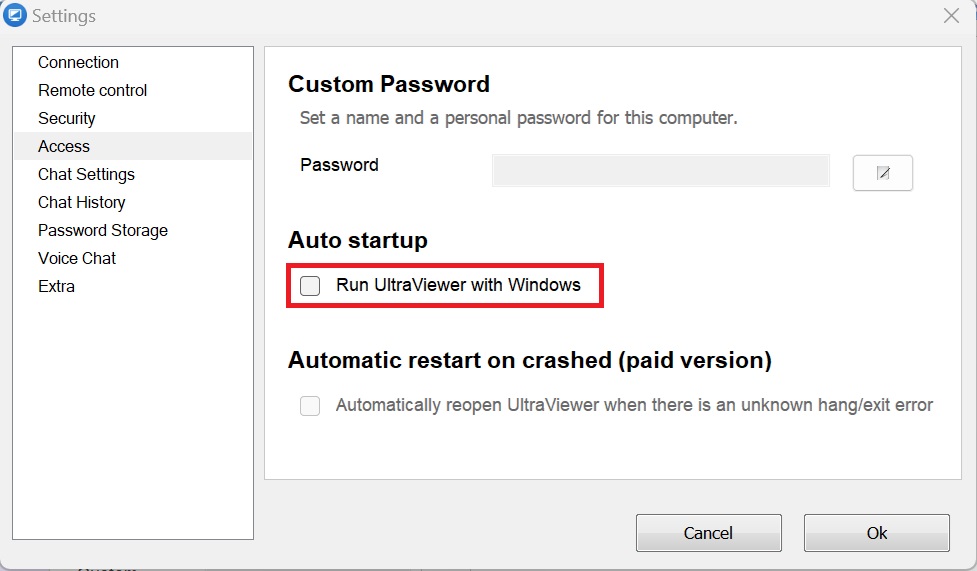
- In the Settings window, navigate to the Access tab.
- Look for the option Run UltraViewer with Windows under Auto startup.
- Uncheck this option to disable automatic startup.
Step 4: Save Changes and Exit
- Click OK to confirm your changes.
- Restart your computer to ensure UltraViewer no longer launches at startup.
✅ Done! UltraViewer will now only run when you open it manually.
Method 2: Disable UltraViewer Startup Directly from the Main Interface
If you’re already inside UltraViewer and want a quicker way to disable startup, follow these steps:
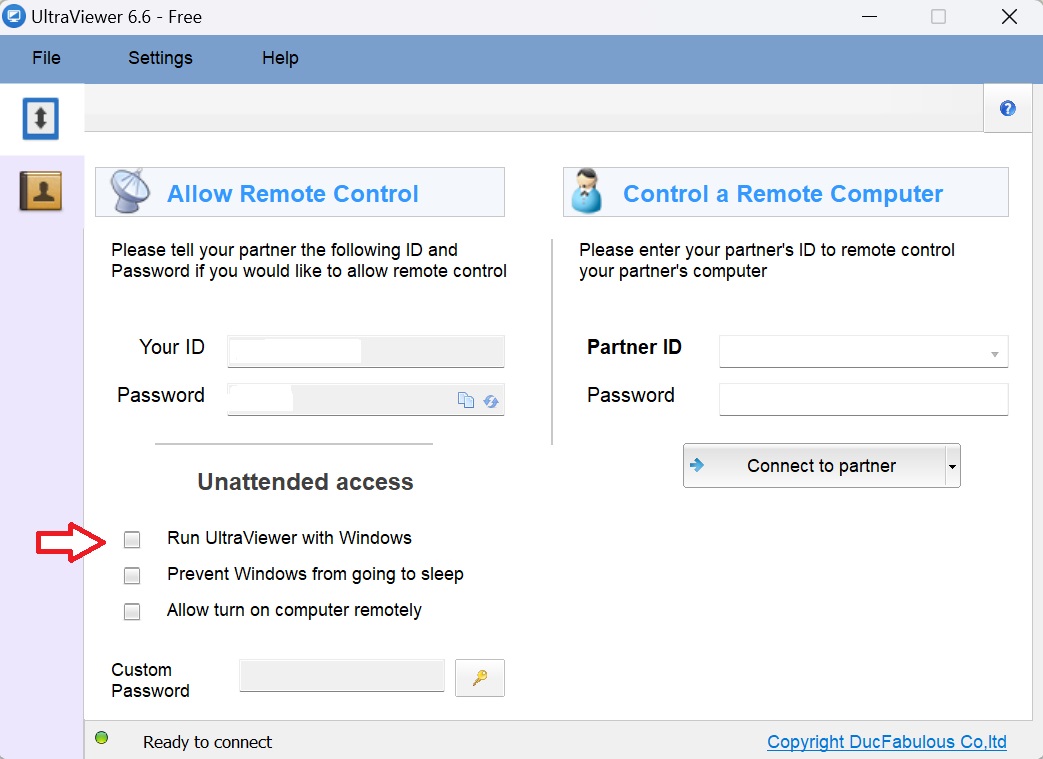
- Open UltraViewer on your computer.
- In the main interface, locate the Run UltraViewer with Windows option.
- Uncheck this option to disable automatic startup.
- Click OK to save your changes.
This method is the fastest way to turn off UltraViewer’s auto startup without going through the full settings menu.
How to Re-enable UltraViewer Startup (Optional)
If you ever need UltraViewer to start with Windows again, simply follow either method above and check the box for Run UltraViewer with Windows under Auto startup, then click OK to save the changes.
Conclusion
Disabling UltraViewer startup with Windows is a simple yet effective way to enhance security and prevent unauthorized access to your computer. By following either of the two methods above, you can ensure that UltraViewer only runs when you explicitly open it, giving you full control over remote access sessions.
For added security, always use strong passwords for your UltraViewer sessions and avoid sharing your UltraViewer ID with untrusted individuals.


Write comments (Cancel Reply)